Install the desktop application
The interactive query editor, catalog browser, and pipeline viewer. A single signed binary for macOS, Windows, and Linux: no Spark, no JVM.
curl -fsSL https://deltaforge.org/install.sh | shOr via Homebrew:
# Add the tap (one-time)
brew tap deltaforge-org/tap
brew install --cask deltaforge-platformiwr -useb https://deltaforge.org/install.ps1 | iexOr via winget (installs the signed MSI and adds the application to your PATH):
winget install DeltaForge.PlatformDetects your architecture (x64 or ARM64), downloads the matching AppImage, and adds a launcher entry:
curl -fsSL https://deltaforge.org/install.sh | shPrefer the terminal? Switch to deltaforge-cli above for scripting and CI, or deltaforge-compute to run a production node.
Verify the download
Every release artifact includes a detached GPG signature and a SHA256SUMS manifest.
# Import the signing key (one-time)
curl -fsSL https://deltaforge.org/pubkey.asc | gpg --import

# Verify a downloaded artifact
gpg --verify deltaforge-cli-1.0.7-linux-x64.tar.gz.sig \
             deltaforge-cli-1.0.7-linux-x64.tar.gz
Fingerprint: B461 8130 D4B0 3CF5 454E 28F0 A859 0BF7 C3DC E5F3 ·
RSA 4096, UID releases@deltaforge.org
FAQ
deltaforge desktop application for interactive development on macOS, Windows, or Linux. For terminal and CI work, switch to deltaforge-cli. For cloud production deployments, use deltaforge-compute.deltaforge-compute package.Installed and ready? Browse the live demos or read CSV to Delta Lake Without Spark.
deltaforge-compute
The headless compute node. Deploy as a native binary on any cloud VM via systemd, or as a container in Docker or Kubernetes. The control plane requires a Postgres instance. No JVM, no Spark cluster to manage. Want the entire platform provisioned in one step, compute included? Use Cloud deployment instead.
The standard production deployment. Install the binary (detects x64 or ARM64), drop a systemd unit, and start the service.
curl -fsSL https://deltaforge.org/install.sh | sh -s -- --pkg deltaforge-computesudo tee /etc/systemd/system/deltaforge-compute.service >/dev/null <<EOF
[Unit]
Description=DeltaForge Compute Node
After=network-online.target
Wants=network-online.target
[Service]
ExecStart=/usr/local/bin/deltaforge-compute
Restart=on-failure
RestartSec=5
Environment=DELTAFORGE_LICENSE_KEY=your-license-key
Environment=DELTAFORGE_CONTROL_PLANE=https://console.deltaforge.org
[Install]
WantedBy=multi-user.target
EOF
sudo systemctl daemon-reload
sudo systemctl enable --now deltaforge-computeOnce running, the node registers itself with your control plane workspace. Add more nodes at any time to scale throughput. See the autoscaling guide.
Useful for local development and testing compute node behaviour before deploying to a cloud VM.
curl -fsSL https://deltaforge.org/install.sh | sh -s -- --pkg deltaforge-computeOr via Homebrew:
# Add the tap (one-time)
brew tap deltaforge-org/tap
brew install deltaforge-compute
Useful for local development on Windows workstations. For production, use the Linux systemd path.
iwr -useb https://deltaforge.org/install.ps1 | iex; Install-DeltaForge -Pkg deltaforge-computeOr via winget:
winget install DeltaForge.ComputeHow it fits together
Compute nodes run inside your cloud environment and read Delta Lake and Iceberg tables directly from object storage. They report license and metering data to the DeltaForge control plane over outbound HTTPS.
%%{init: {'theme': 'dark', 'themeVariables': {'primaryColor': '#1e1e2e', 'primaryBorderColor': '#b95731', 'lineColor': '#b95731', 'secondaryColor': '#13131a', 'tertiaryColor': '#0d0d14', 'clusterBkg': '#1a1b23', 'clusterBorder': '#444', 'edgeLabelBackground': '#13131a', 'nodeTextColor': '#e0e0e0'}}}%%
flowchart TB
    subgraph clients["Client Tools"]
        pbi["Power BI / Excel / Tableau"]
        db["DBeaver / JDBC Applications"]
        ai["Claude / Cursor via MCP"]
        dfd["DeltaForge Desktop"]
    end

    subgraph cp["Control Plane (self-hosted or cloud)"]
        cpsvc["deltaforge-control-plane :3000"]
        pg[("PostgreSQL")]
        cpsvc --- pg
    end

    subgraph cloud["Your Cloud: AWS, Azure, On-Premises"]
        lb["Load Balancer / ASG / VMSS"]

        subgraph nodes["Compute Fleet - horizontal scale"]
            n1["deltaforge-compute"]
            n2["deltaforge-compute"]
            n3["deltaforge-compute ... +N"]
        end

        subgraph store["Object Storage: S3 / ADLS Gen2"]
            dl["Delta Lake Tables"]
            ice["Iceberg Tables"]
        end
    end

    pbi & db --"ODBC / ADBC"--> cpsvc
    ai --"MCP"--> cpsvc
    dfd --"HTTP API"--> cpsvc
    cpsvc --"query routing"--> lb
    lb --> n1 & n2 & n3
    n1 & n2 & n3 --"Parquet I/O"--> store
AWS EC2
Install on any EC2 instance (x86-64 or ARM64), point table LOCATION paths at s3:// URIs, and IAM role credentials are picked up automatically from the instance profile.
Azure VM
Deploy on any Azure VM or VMSS. Table LOCATION paths use abfss:// (ADLS Gen2) or wasbs:// (Blob Storage) URIs. Managed Identity credentials are picked up automatically.
Container or native binary
Deploy as a Docker container, in Kubernetes via Helm, or as a standalone binary on a VM fleet managed by an Auto Scaling Group or VMSS. The control plane also runs containerised and requires Postgres.
Deploy the platform on your cloud
One template per cloud, written in each cloud's native language: Bicep on Azure, CloudFormation on AWS, Terraform on Google Cloud. A single deployment provisions the whole platform: web console, control plane, managed PostgreSQL catalog, object storage for your tables, a secret store, and HTTPS. Storage auth is keyless (managed identity, IAM task role, or service account), and you do not need a license key up front: the platform provisions a Community license automatically on first boot, attested by your cloud account. Templates live in deltaforge-org/delta-forge/deploy.
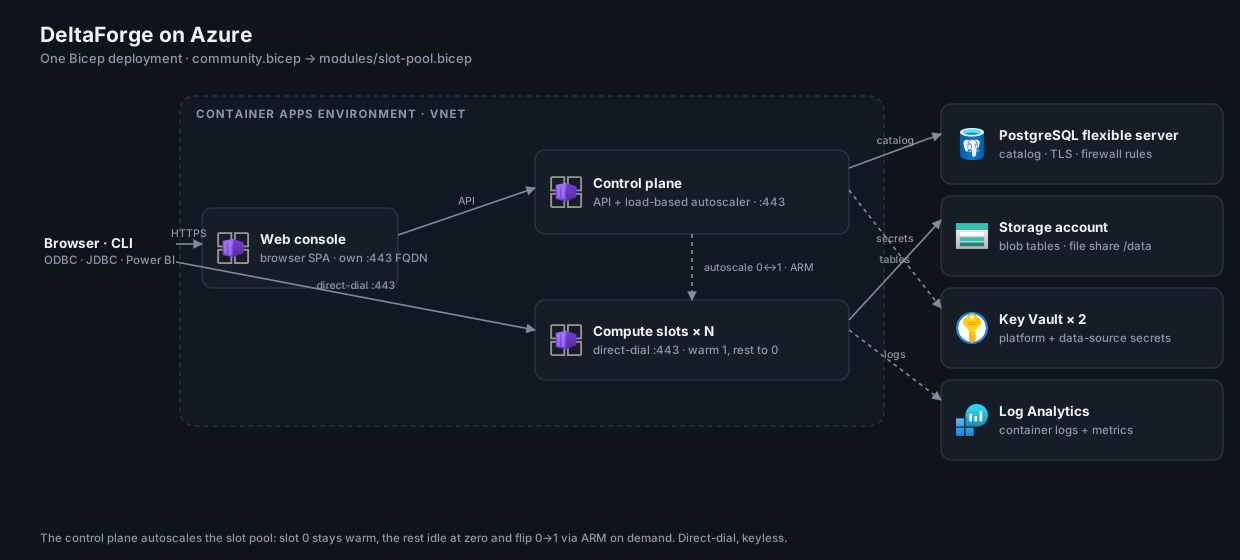
community.bicep provisions on Azure Container Apps. Why these services →Deploy straight from the portal. The button opens Azure's guided deployment form (resource group, admin accounts, sizing), generated from the same UI definition the Azure Marketplace offer uses:
 Deploy to Azure
Or from the command line with the Bicep source. Only the three passwords are required; everything else has sensible defaults:
git clone https://github.com/deltaforge-org/delta-forge
cd delta-forge/deploy/azure

az group create --name deltaforge --location westeurope
az deployment group create --resource-group deltaforge \
  --template-file community.bicep \
  --parameters adminPassword=<min-12-chars> \
               engineerPassword=<min-12-chars> \
               pgAdminPassword=<min-12-chars>
The deployment runs on Azure Container Apps with a pool of scale-to-zero compute slots that the built-in autoscaler starts and parks on demand. Pick the template for your tier: community.bicep (1 slot), standard.bicep (4 slots), or professional.bicep (9 slots). The guiEndpoint output is your console URL; sign in with the admin email and password you chose.
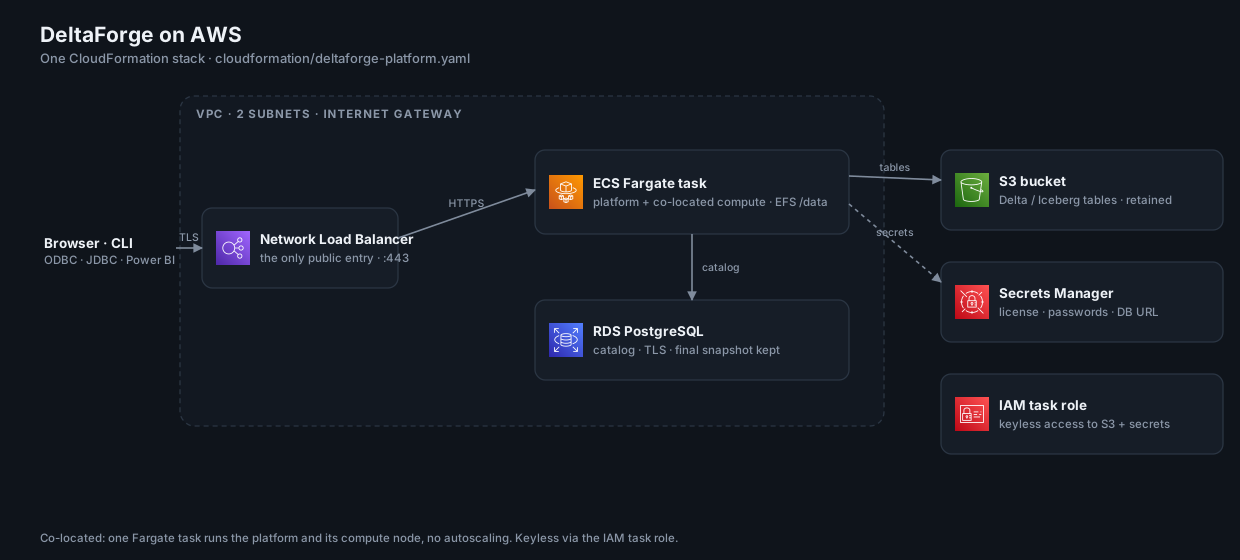
One CloudFormation stack provisions everything. Only the three passwords are required; everything else has sensible defaults:
git clone https://github.com/deltaforge-org/delta-forge
cd delta-forge/deploy/aws

aws cloudformation deploy \
  --stack-name deltaforge \
  --template-file cloudformation/deltaforge-platform.yaml \
  --capabilities CAPABILITY_IAM \
  --parameter-overrides \
      AdminPassword=<min-12-chars> \
      EngineerPassword=<min-12-chars> \
      PgAdminPassword=<min-12-chars>

# Read the console URL once the stack is up
aws cloudformation describe-stacks --stack-name deltaforge \
  --query "Stacks[0].Outputs[?OutputKey=='ConsoleUrl'].OutputValue" --output text
First boot runs the headless bootstrap: it provisions the catalog schema in RDS, seeds the admin and engineer accounts, and activates the license. Give it a couple of minutes, then browse to the console URL. On stack delete, the S3 tables bucket and a final RDS snapshot are retained so your data survives a teardown.
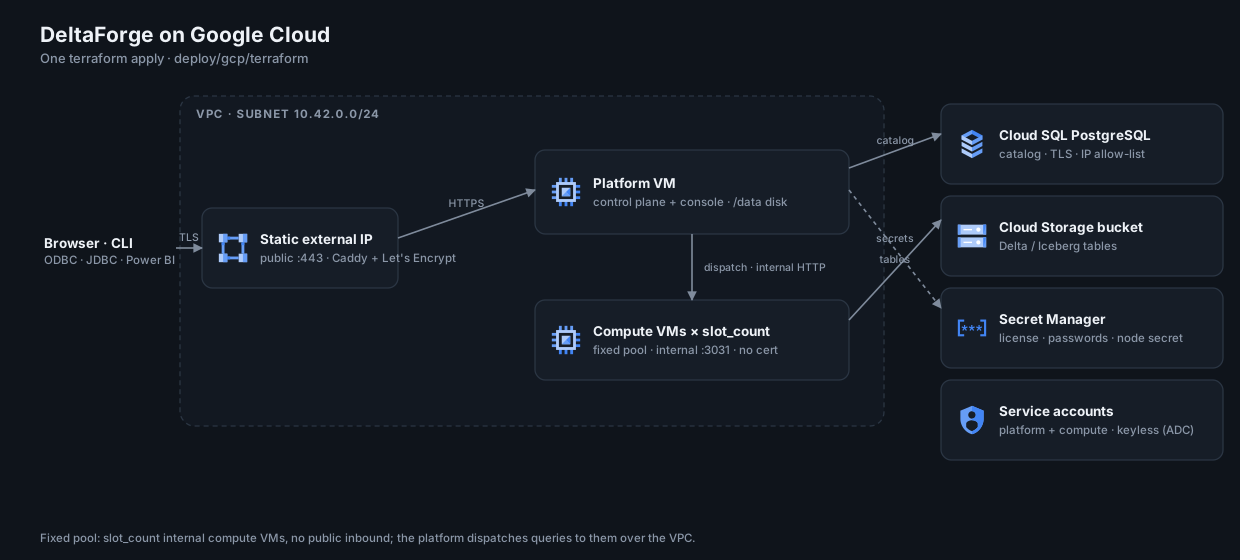
terraform apply provisions. Why these services →Open the Terraform module directly in Cloud Shell, or run it from any machine with Terraform 1.5+:
 Open in Cloud Shell
git clone https://github.com/deltaforge-org/delta-forge
cd delta-forge/deploy/gcp/terraform

cp terraform.tfvars.example terraform.tfvars
# set project_id; everything else has sensible defaults

terraform init
terraform apply

terraform output console_url
Admin and engineer passwords are auto-generated: read them with terraform output -raw admin_password, or from Secret Manager. First boot installs Docker on the VM, mounts the data disk, and runs the headless bootstrap; give it a few minutes before browsing to console_url.
What each template provisions
The same topology on every cloud, mapped to that cloud's managed services. No access keys are stored anywhere: the engine reaches object storage through the platform's own cloud identity.
- Azure Container Apps with managed TLS
- Scale-to-zero compute slot pool, flipped by the built-in autoscaler
- PostgreSQL Flexible Server catalog
- Blob Storage for tables (
abfss://) - Key Vault secrets, managed identity auth

- ECS Fargate task behind a Network Load Balancer
- RDS for PostgreSQL catalog
- S3 bucket for tables (
s3://) - EFS for durable engine state
- Secrets Manager, IAM task-role auth
- Compute Engine VM (Ubuntu + Docker) on a static IP
- Cloud SQL for PostgreSQL catalog
- GCS bucket for tables (
gs://) - Persistent disk for durable engine state
- Secret Manager, service-account auth
Need a single compute node joining an existing control plane instead? Switch to deltaforge-compute above. For how compute scales up and down after the deploy, see the autoscaling guide.
deltaforge-cli
Single binary for scripting queries, running SQL files, executing pipelines, and checking cluster health from any terminal or CI environment.
curl -fsSL https://deltaforge.org/install.sh | sh -s -- --pkg deltaforge-cliOr via Homebrew (add the DeltaForge tap once, then install deltaforge-cli as a formula):
# Add the tap (one-time)
brew tap deltaforge-org/tap
brew install deltaforge-cli
Tap source: github.com/deltaforge-org/homebrew-tap
iwr -useb https://deltaforge.org/install.ps1 | iex; Install-DeltaForge -Pkg deltaforge-cliOr via winget (installs the signed binary into your PATH) or Scoop (the preferred choice for portable, no-admin installs):
winget install DeltaForge.CLI# Add the bucket (one-time)
scoop bucket add deltaforge https://github.com/deltaforge-org/scoop-bucket
scoop install deltaforge-cliDetects your architecture (x64 or ARM64), downloads the matching tarball, and drops the binary on your PATH:
curl -fsSL https://deltaforge.org/install.sh | sh -s -- --pkg deltaforge-cliOr manually:
# Substitute the latest version from the releases page
curl -fsSL https://github.com/deltaforge-org/delta-forge/releases/download/v1.0.0/deltaforge-cli-1.0.0-linux-x64.tar.gz \
  | sudo tar -xz -C /usr/local/bin
Common commands
A few things you can do from the terminal once the binary is on your PATH.
Run a SQL file
Execute any SQL script against a DeltaForge workspace and stream results to your terminal.
deltaforge-cli run query.sqlExecute a pipeline
Trigger a numbered pipeline script and watch step-by-step progress in the terminal.
deltaforge-cli pipeline run --file pipeline.sqlHealth check
Check the reachability and version of every registered compute node in a workspace.
deltaforge-cli statusdeltaforge-mcp
Plugs DeltaForge into any MCP-compatible AI assistant. Exposes your Delta Lake catalog, pipeline graph, lineage, and query execution as typed tools an AI can call directly. No custom prompts, no clipboard-pasting schemas.
curl -fsSL https://deltaforge.org/install.sh | sh -s -- --pkg deltaforge-mcpOr via Homebrew (add the DeltaForge tap once, then install deltaforge-mcp as a formula):
# Add the tap (one-time)
brew tap deltaforge-org/tap
brew install deltaforge-mcp
Tap source: github.com/deltaforge-org/homebrew-tap
iwr -useb https://deltaforge.org/install.ps1 | iex; Install-DeltaForge -Pkg deltaforge-mcpOr via winget (installs the signed binary into your PATH) or Scoop (the preferred choice for portable, no-admin installs):
winget install DeltaForge.Mcp# Add the bucket (one-time, skip if already added)
scoop bucket add deltaforge https://github.com/deltaforge-org/scoop-bucket
scoop install deltaforge-mcpDetects your architecture (x64 or ARM64) and downloads the matching binary. --pkg deltaforge-mcp selects the MCP server instead of the default CLI package:
curl -fsSL https://deltaforge.org/install.sh | sh -s -- --pkg deltaforge-mcpWire it into your AI assistant
Point your AI assistant's MCP config at the server binary. The format is the same across all MCP-compatible tools.
{
  "mcpServers": {
    "deltaforge": {
      "command": "deltaforge-mcp",
      "args": ["--workspace", "your-workspace-id"]
    }
  }
}
Claude Desktop
Add the config block to claude_desktop_config.json: ~/Library/Application Support/Claude/ on macOS or %APPDATA%\Claude\ on Windows. Restart Claude Desktop to pick it up.
Cursor
Open Cursor Settings, navigate to the MCP section, and paste the config block. Cursor reloads MCP servers without restarting, so the tools become available immediately.
VS Code with Copilot
Add the config block to your workspace or user settings.json under the mcp.servers key. The Copilot chat panel picks up the server on the next activation.
Full reference of exposed tools: MCP server documentation.